![]()
Official repository of deepflash2 - a deep-learning pipeline for segmentation of ambiguous microscopic images.


![]()
The best of two worlds: Combining state-of-the-art deep learning with a barrier free environment for life science researchers.
Read the paper, watch the tutorials, or read the docs.
- No coding skills required (graphical user interface)
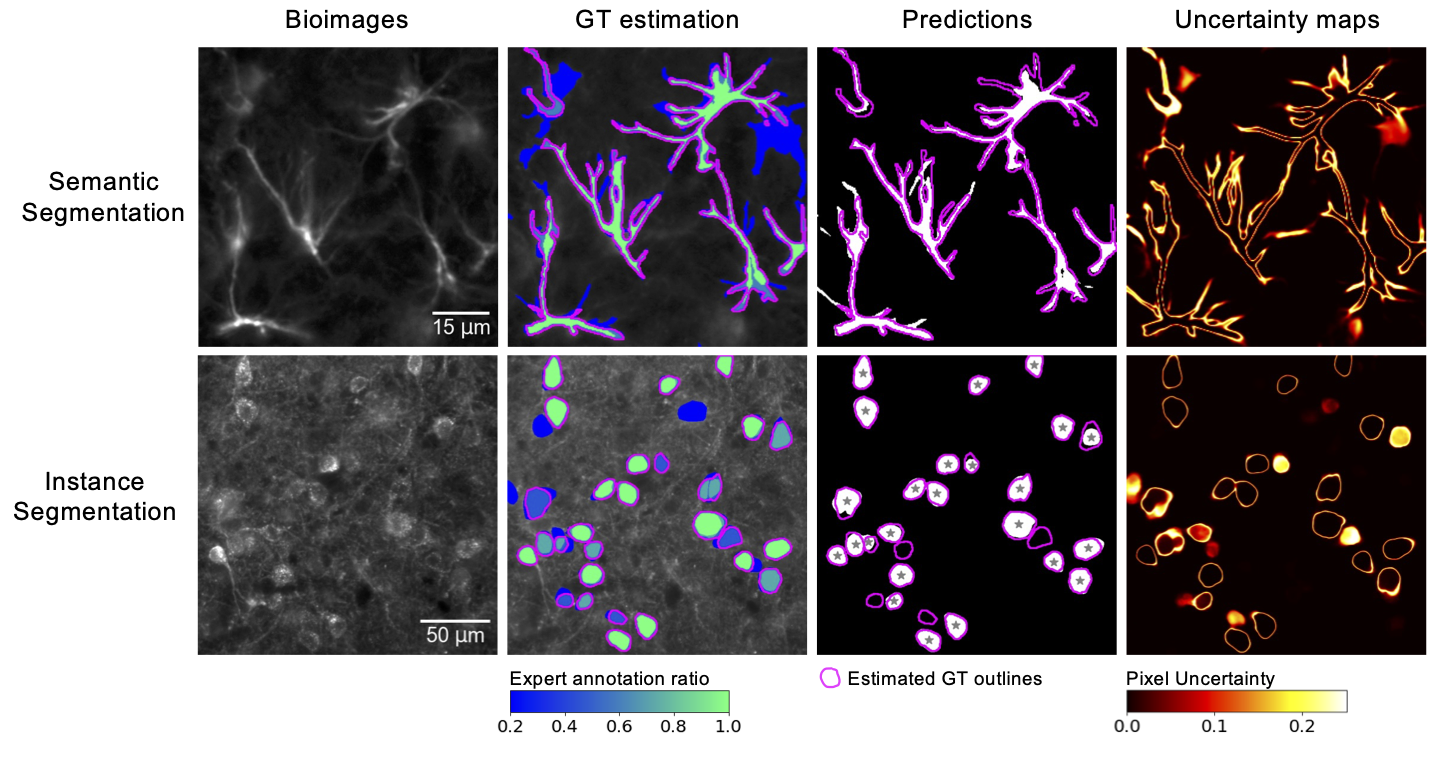
- Ground truth estimation from the annotations of multiple experts for model training and validation
- Quality assurance and out-of-distribution detection for reliable prediction on new data
- Best-in-class performance for semantic and instance segmentation

Kaggle Gold Medal and Innovation Price Winner: The deepflash2 Python API built the foundation for winning the Innovation Award a Kaggle Gold Medal in the HuBMAP - Hacking the Kidney challenge. Have a look at our solution
Quick Start and Demo
Get started in less than a minute. Watch the tutorials for help.
Demo on Hugging Face Spaces
Go to the demo space -- inference only (no training possible).
Demo usage with Google Colab
For a quick start, run deepflash2 in Google Colaboratory (Google account required).
![]()
The GUI provides a build-in use for our sample data.
- Starting the GUI (in Colab or follow the installation instructions below)
- Select the task (GT Estimation, Training, or Prediction)
- Click the
Load Sample Databutton in the sidebar and continue to the next sidebar section.
For futher instructions watch the tutorials.
We provide an overview of the tasks below:
| Ground Truth (GT) Estimation | Training | Prediction | |
|---|---|---|---|
| Main Task | STAPLE or Majority Voting | Ensemble training and validation | Semantic and instance segmentation |
| Sample Data | 5 masks from 5 experts each | 5 image/mask pairs | 5 images and 2 trained models |
| Expected Output | 5 GT Segmentation Masks | 5 models | 5 predicted segmentation masks (semantic and instance) and uncertainty maps |
| Estimated Time | ~ 1 min | ~ 150 min | ~ 4 min |
Times are estimated for Google Colab (with free NVIDIA Tesla K80 GPU).
Paper and Experiments
We provide a complete guide to reproduce our experiments using the deepflash2 Python API here. The data is currently available on Google Drive and Zenodo.
Our Nature Communications article is available here. Please cite
@article{Griebel2023,
  doi = {10.1038/s41467-023-36960-9},
  url = {https://doi.org/10.1038/s41467-023-36960-9},
  year = {2023},
  month = mar,
  publisher = {Springer Science and Business Media {LLC}},
  volume = {14},
  number = {1},
  author = {Matthias Griebel and Dennis Segebarth and Nikolai Stein and Nina Schukraft and Philip Tovote and Robert Blum and Christoph M. Flath},
  title = {Deep learning-enabled segmentation of ambiguous bioimages with deepflash2},
  journal = {Nature Communications}
}
System requirements
Works in the browser or on your local pc/server
deepflash2 is designed to run on Windows, Linux, or Mac (x86-64) if pytorch is installable. We generally recommend using Google Colab as it only requires a Google Account and a device with a web browser. To run deepflash2 locally, we recommend using a system with a GPU (e.g., 2 CPUs, 8 GB RAM, NVIDIA GPU with 8GB VRAM or better).
deepflash2 requires Python>3.6 and the software dependencies are defined in the settings.ini file. Additionally, the ground truth estimation functionalities are based on simpleITK>=2.0 and the instance segmentation capabilities are complemented using cellpose v0.6.6.dev13+g316927e.
deepflash2 is tested on Google Colab (Ubuntu 18.04.5 LTS) and locally (Ubuntu 20.04 LTS, Windows 10, MacOS 12.0.1).
Installation Guide
Typical install time is about 1-5 minutes, depending on your internet connection
The GUI of deepflash2 runs as a web application inside a Jupyter Notebook, the de-facto standard of computational notebooks in the scientific community. The GUI is built on top of the deepflash2 Python API, which can be used independently (read the docs).
Google Colab
![]()
Open Colab and excute the Set up environment cell or follow the pip instructions. Colab provides free access to graphics processing units (GPUs) for fast model training and prediction (Google account required).
Other systems
We recommend installation into a clean Python 3.7, 3.8, or 3.9 environment (e.g., using conda).
mamba/conda
Installation with mamba (installaton instructions) allows a fast and realiable installation process (you can replace mamba with conda and add the --update-all flag to do the installation with conda).
mamba install -c fastchan -c conda-forge -c matjesg deepflash2
pip
If you want to use your GPU and install with pip, we recommend installing PyTorch first by following the installation instructions.
pip install -U deepflash2
Using the GUI
If you want to use the GUI, make sure to download the GUI notebook, e.g., using curl
curl -o deepflash2_GUI.ipynb https://raw.githubusercontent.com/matjesg/deepflash2/master/deepflash2_GUI.ipynb
and start a Jupyter server.
jupyter notebook
Then, open deepflash2_GUI.ipynb within Notebook environment.
Docker
Docker images for deepflash2 are built on top of the latest pytorch image.
- CPU only
docker run -p 8888:8888 matjes/deepflash2 ./run_jupyter.sh - For training, we recommend to run docker with GPU support (You need to install Nvidia-Docker to enable gpu compatibility with these containers.)
docker run --gpus all --shm-size=256m -p 8888:8888 matjes/deepflash2 ./run_jupyter.sh
All docker containers are configured to start a jupyter server. To add data, we recomment using bind mounts with /workspace as target. To start the GUI, open deepflash2_GUI.ipynb within Notebook environment.
For more information on how to run docker see docker orientation and setup.
Creating segmentation masks with Fiji/ImageJ
If you don't have labelled training data available, you can use this instruction manual for creating segmentation maps. The ImagJ-Macro is available here.